How to use a Scanner
A quick overview of how to scan an image from a hard copy.
You might find yourself in the situation where you need to scan a photo before you can use it on your computer. You'll need to do this if you only have a hard copy of the photo (i.e. not a digital copy).
Before you scan a photo, you need the following equipment:
- A scanner
- Scanner software
The Scanner
Scanners typically come in two types - flatbed, and sheetfed. A flatbed scanner is one where you to open the lid and place the photo on the glass platen. Flatbed scanners allow you to scan all sorts of things such as paper, photos, leaves, fabric etc. A sheetfed scanner is one where you feed the photo into the scanner via a slot. A sheetfed scanner is more limited to what you can scan as it needs to fit into the slot.
The Scanner Software
Most scanners come with their own software. This usually contains the scanner driver as well as a basic image editor to assist you with scanning and touching up your photos. You will need to install the software before you use the scanner for the first time. This is usually very easy - just run the CD that came with the scanner and follow the prompts.
As long as the scanner software has been installed, you can also use your own software to initiate each scan. Most photo editing applications allow you to access the scanner via their "File" menu. Examples of photo editing software include Adobe Photoshop, Corel Paintshop Pro, and The Gimp.
Scanning a Photo
Assuming your scanner has been set up and it's connected to your computer/network, the actual steps you use to scan a photo (or anything else) will depend on your scanner. Typically, it will be one of the following:
Method 1 - Automatic
Some scanners will automatically start scanning as soon as you place the photo in. It doesn't get much easier than this! Once it has been scanned, the prompts usually make it easy for you to touch up the image and save it.
- Position the photo in the scanner
- The photo will automatically be scanned (or previewed) and will appear within the scanner software. From here, things should be quite intuitive - just follow the onscreen prompts.
Method 2 - Semi-Automatic
Similar to the first method. The only difference is that you need to push the "Start Scanning" button on the scanner itself before it starts scanning.
- Position the photo in the scanner
- Press the "Start Scanning" (or similar) button on the scanner.
- The photo will automatically be scanned and will appear within the scanner software. From here, things should be quite intuitive - just follow the onscreen prompts.
Method 3 - Scanning via the Scanner Software
Scanner software is usually quite intuitive - all you need to do is open it up and follow the prompts.
- Position the photo in the scanner
- Open the scanner software (i.e. via an icon on your desktop or from the "Start" menu depending on your computer).
- Once you've opened the scanner software, it will usually give you some options such as "Scan Photos", "Preview" etc. Follow the prompts and you should be OK. If you make a mistake it won't matter - just delete the first scan and start another scan.
- Once you select "Start Scanning" (or similar), the photo will automatically be scanned and will appear within the scanner software. From here, things should be quite intuitive - just follow the onscreen prompts.
Method 4 - Scanning via your Graphics Software
This is the most involved out of all methods. Once you've done it a few times, you'll realize that scanning photos is actually quite easy.
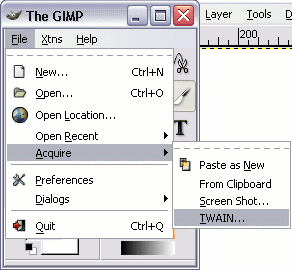
Generally, to initiate a scan, go "File > Acquire > TWAIN" and select your scanner from a list. From there, it's usually quite intuitive.
Because this method is a bit more involved, here's a detailed example. In this example, I'm going to use a photo editor called "The GIMP" to initiate the scan. These steps are pretty typical of what you need to do when scanning via graphics software.
Now, assuming you have your graphics software open, do the following (or similar):
- Via the "File" menu, select "Acquire", then "TWAIN". If you don't see these options, you might need to select "File > Scanner > Import" or something similar. The terminology sometimes changes between software, but they all do the same basic thing.

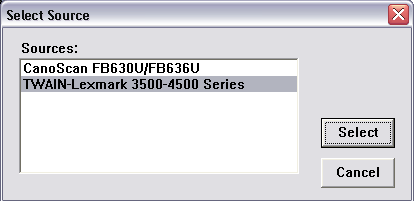
- Select the scanner you're using from the list. You may only have one scanner - just select that. As you can see, I have two scanners. If you don't see your scanner here, it may be that you still need to install the driver. Check the CD that came with the scanner.

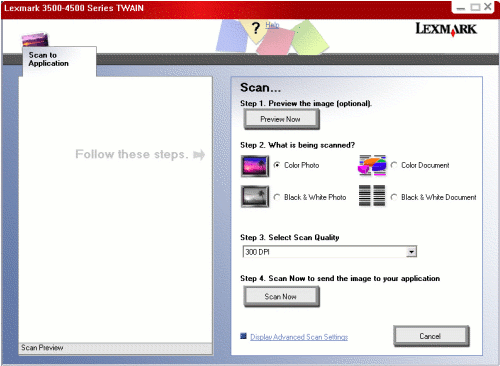
- At this stage, my graphics software has accessed the scanner software using the TWAIN standard. As you can see, the scanner software makes it pretty easy from here on. You can click "Preview" to check that your photo is positioned correctly etc. You can also change the scan quality. Note that if you're only going to use the image on the web, 72 dpi is fine. Having said this, by increasing the resolution, the more detail you capture (and the bigger the image becomes). Higher resolution will often result in a much larger file size, so if you use anything other than 72 dpi for the web, check the file size once you've scanned it.
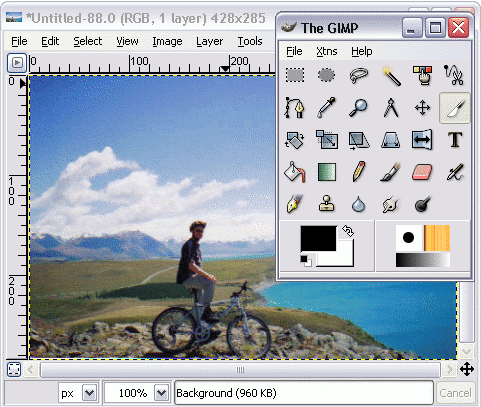
- So, after clicking the "Scan Now" button, the scanner starts making noises, and after a few seconds, the image pops up on my screen. Note that this image has been transferred to my graphics software (The GIMP).


So, now that the photo has been scanned, you can save it just as you would any other file (i.e. via the "File > Save As..." menu). Once you've saved it you don't need to do anything more. Having said this, you can make changes to the image as you wish. For example, you might want to resize it, use a filter such as "sharpen", "despeckle" etc.
If you intend to use your photos on the web, you'll need to make sure you save it in the correct format. To learn about saving images for the web, check out Exporting to Web Format.