Adding Text with GIMP
Adding text to an image is a common task. It's highly likely that you'll find yourself working with text on a regular basis. Therefore, it is important that you understand how text works in GIMP.
Adding text with GIMP is a bit different to adding text with say, a word processing application (such as MS Word or WordPerfect).
At first, you might find GIMP a bit "clunky" when working with text. Hang in there though. Once you get the hang of it, you will find that GIMP provides you with an enormous range of options for how your text is presented.
How To Add Text
To add text in GIMP, open a new image (File > New) and then do the following:
-
Select the Text Tool
To select the text tool, click the Text tool icon from the main toolbox:

-
Initiate the Text Input
Click within the image, roughly where you would like the text to appear.
-
Enter the Text

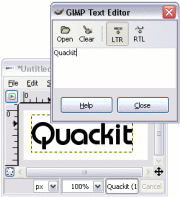
The GIMP Text Editor will pop up. Enter your text into the text editor.
As you type, the image will be updated with your text using the current style. Don't worry if it's not in the style you want, you can change the style later on. At this stage, it should look something like this.
In newer versions of GIMP, the pop-up text editor is optional.
It is disabled by default, however you can use it by selecting
Use editor in the Tool Options dialog. -
Close the Editor
Once you've written your text, feel free to close the GIMP Text Editor. You can open it again later if you need to change anything.
To close the editor, click Close.
In newer versions of GIMP, this step is only needed if you're using the (optional) pop-up text editor.
Text And Layers
When you add text in GIMP, a new layer is added automatically. When you view your Layers dialog, you will see a new layer containing the text you just created.
This is quite handy, as it gives you the ability to manipulate the text without affecting other parts of the image. As mentioned previously, this is one of the main benefits of layers.
Manipulating The Text
Once you've added your text, you can then manipulate it as required. For example, you can change the font family, change the size, color, etc. You can also do things like, apply special effects/filters against your text, transform your text using transformation tools, etc.
Changing The Font
Now that you've entered your text, you may be wondering how to do something simple, such as change the font.
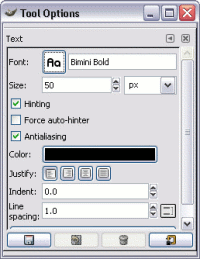
This is where the Tool Options dialog comes in handy.
To change the font (as well as other properties):
-
Select Layer/Text Tool
Make sure you still have the Text tool selected (on the main toolbox), and that the correct layer is currently selected/highlighted. If these aren't selected, select them now.
-
Open the Tool Options

Select Dialogs > Tool Options to open the Tool Options dialog (if it's not open already).
Update
More recent versions of GIMP now use Windows > Dockable Dialogs > Tool Options
-
Change the font as required. To do this, click on the Aa button and select a font from the list.
As you can see, there are other properties that you can change here.
A common mistake by beginners is that they forget to do step 1. In other words:
- They forget to select the correct layer before changing the text properties; and/or
- They forget to select the Text tool (from the main toolbox). This results in the Tool Options dialog not displaying the font properties (it presents properties for a different tool - whichever tool is selected)
So, if you have trouble getting the text properties to display, this could be the reason. So, don't forget to do step 1.