Resizing Images in GIMP
Resizing an image is one of the most common uses of image editing software. This article demonstrates how to resize an image using GIMP.
Resizing an Image using GIMP
You use the "Scale Image" feature to resize images in GIMP.
Here, we'll resize the little face that we created in the last lesson. So, to refresh our memory, here's what that image looks like:

We'll now use the "Scale Image" feature to resize the image.
-
Launch the Scale Image Dialog

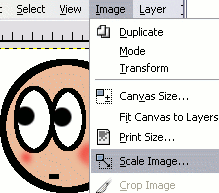
From the Image menu, click Scale Image.
-
Set the Image Size

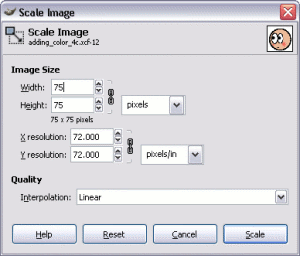
A dialog box is displayed for changing the size of your image. You can select an exact size (eg. pixels), or you can choose a percentage to scale to. In this example, I have chosen to resize the image to 75x75 pixels.
The chain icon constrains the proportions of the image — it forces height and width to stay proportional to each other. Therefore, if you scale the width, the height will automatically be scaled too (otherwise the image would end up looking warped). If you don't want proportions to be constrained, you can break the chain by clicking on it.
Once you're happy with your adjustments, click OK.
That's all there is to resizing an image using the GIMP. You should now see the resized image:

Resizing images works best when making the image smaller. If you try to make the image larger, the image will lose quality. If you resize it too large, the image will become quite visibly pixelated.
When resizing images, it's a good idea to keep a copy of the image in its original size. That way you won't lose quality if you ever need to revert to the original size.
Thumbnails
A common reason for resizing images is to display a smaller image first, which when clicked on, will display the image at full size. The smaller image is often referred to as a "thumbnail".
When creating thumbnails, don't be tempted to resize the same (larger) image just by using HTML. It is much better to resize an image in an editor (as above) than to rely solely on HTML. Resizing an image in HTML doesn't actually resize the image — it just forces the image to display at a smaller size. This wastes bandwidth (the image still has the larger filesize), and it could also diminish the quality of the displayed image.
Yes, it's true that you will need to change the HTML, but as long as you resize the actual image itself also.