Adding Color with GIMP
So now that we have created our first image, lets add some color to it.
Adding color to an image is a easy as a couple of clicks. Changing the color is just as easy.
Before you add color to your image, you need to select a color. You do this using the color area in the toolbox.
Selecting a New Color
To select a new color, click on either the foreground color or the background color from the color area then select the new color from the color palette.
For example, to select a new foreground color:
-
Launch the Color Picker
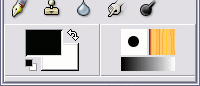
The color area shows two colors: the foreground and background colors.
Click on the foreground color.
-
Choose a Color
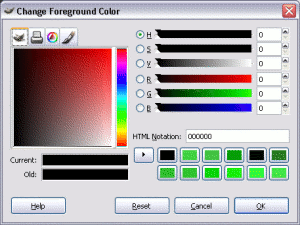
You will now see a color picker.
Click in any of the color areas to select a color.
Alternatively, use the large square at the left. This is the Gimp Color Selector.
In our screenshot, the Gimp Color Selector is filled with reds that fade to black and white. If we wanted to select say, green, we would first click the color strip to the right (we would click somewhere in the green area of the strip).
Doing this would automatically fill the Gimp Color Selector with green. We could then click anywhere in this large square to refine our selection of green.
You can also use the tabs at the top of the large square to change colors. These represent different modes of color selection. The printer icon represents CMYK, the triangle is for selecting color by hue, and the brush icon selects watercolor.
When using watercolor mode to choose your colors, you can click in the large square multiple times. Each time you click, you add more color to your selection.
-
Complete the Color Selection
Once you're happy with your color selection, click OK
The new color will appear as the foreground color in the toolbox.
The Eyedropper Tool
If you want to select a color that's already on your image, you can use the eyedropper tool (from the main toolbox). With the eyedropper tool selected, simply click anywhere in the image. This will set the foreground color to the same as the area of the image you just clicked on.
The eyedropper icon looks like this: ![]()
Applying Your Color
Now that you have selected a color, you can apply it to your image.
There are different ways of applying color to your image. The quickest way is to use the paintbucket.
Option 1: The Paintbucket
The paintbucket allows you to apply color to a large area of your image. To apply color using the paintbucket:
-
Select the Paintbucket Tool
Click the paintbucket icon in the toolbox:

-
Apply the Color
Now click on your image in the area you wish to apply the color to. In this example, I clicked somewhere within the face.
Before:

After:

Option 2: Drawing/Paint Tools
Whenever you use a drawing or paint tool, the color is automatically set at the current foreground color (i.e. the selected color from the color area). To change the color of the drawing/paint tool, simply select a new color as shown above.
In the example below, I've made my little face blush:

I did this using the airbrush tool (from the main toolbox) and selecting a darker shade of red. The airbrush icon looks like this: