SQL Server 2014 - User Logins
SQL Server enables the creation of users and logins. Each individual who needs access to SQL Server can be given their own user account.
When creating a new user login, the administrator can assign that login to any number of roles and schemas. This will depend on what that particular login is entitled to.
Here, we will create a new login and then a new user for that login.
To Create a New Login
- Using SQL Server Management Studio, expand the Security option (at the server level, not at the database level) and right click on Logins.
- Click on New Login...
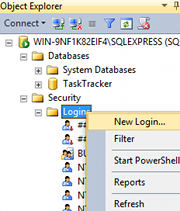
If you can't see the Logins option, make sure you have the correct Security option expanded. It should be the one at the server level, not the one under your database name.
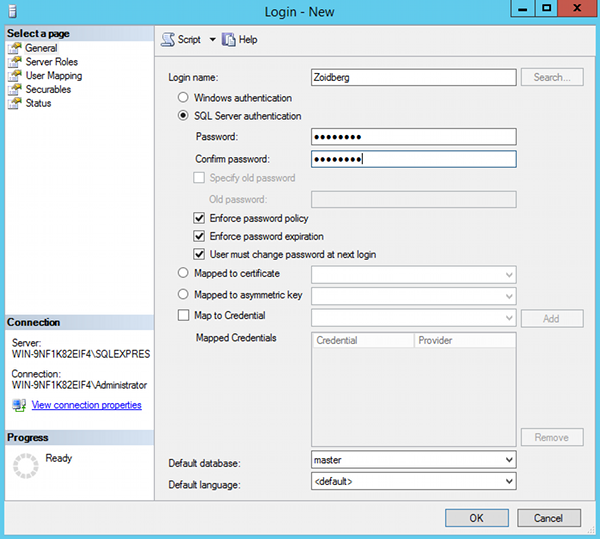
- Complete the login properties in the General tab by providing a name for the login, choosing the Authentication method (providing a password if you choose SQL Server authentication), and selecting the database to use as a default. If you don't choose a language, it will use the default for the current installation of SQL Server.
SQL Server may prevent you from creating the login if you don't provide a strong enough password so be sure to provide a strong password.
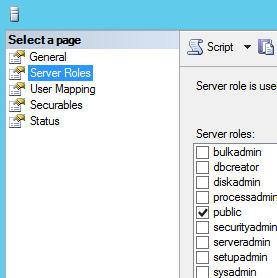
- Click the Server Roles tab if you need to apply any server-wide security privileges.
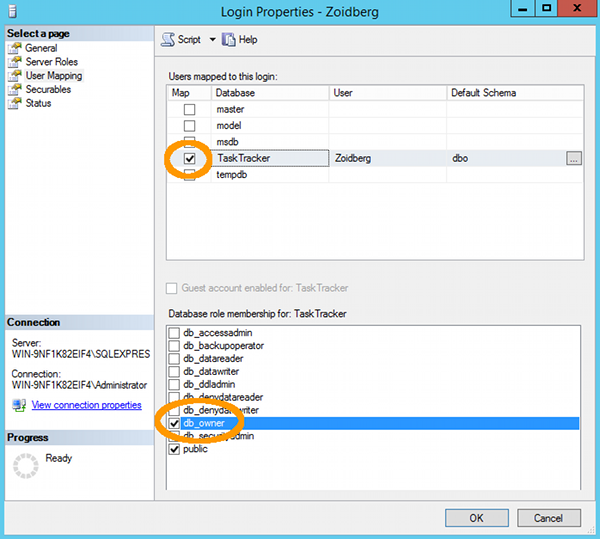
- Click the User Mapping tab to specify which databases this user account is allowed to access. By default, the login will be assigned to the Public role, which provides the login with basic access. If the login needs more access in one or more databases, it can be assigned to another role with greater privileges. In this case, select TaskTracker database and db_owner role for that database.
Note that these roles are database roles and are different to the server roles in the previous tab. Server roles are for administering the SQL Server. Database roles are more limited. They are created within each database and specify what the login can do within that particular database.
- Click OK to create the login.
Test your New Login
To test your new login:
- Re-connect to SQL Server using your newly created login. You can do this by selecting Change Connection... from the Query menu in the toolbar:

You can also right-click in a query window to bring up this contextual menu.
- You will be prompted to connect. Enter the new login details to connect.
Common Error (18456)
If you get a 18456 authentication error when trying to connect with the new login details, it's probably because your database isn't configured to accept SQL Server Authentication. If your login uses SQL Server Authentication, you won't be able to login to SQL Server unless it is configured to use SQL Server Authentication. Fortunately this is easily fixed.
To fix this, you'll need to log back in with your good login (i.e. the one that actually works), and modify the properties for your SQL Server, so that it accepts SQL Server Authentication.
Once you've logged back in, do the following:
- In the Object Explorer, right-click on the server name and select Properties from the contextual menu:

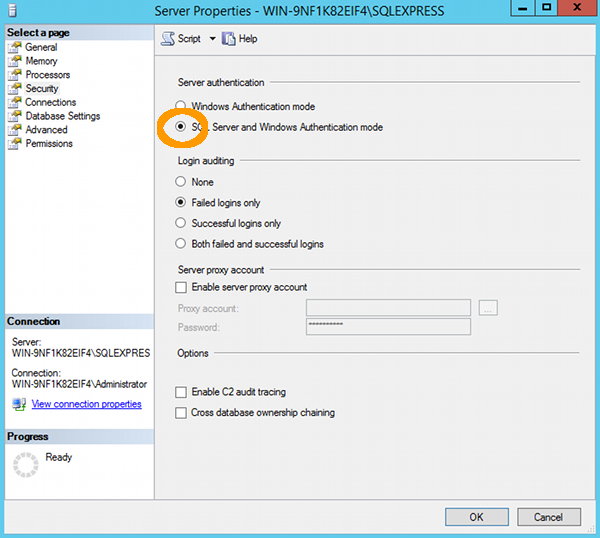
- In the Properties box, select Security then select SQL Server and Windows Authentication Mode:
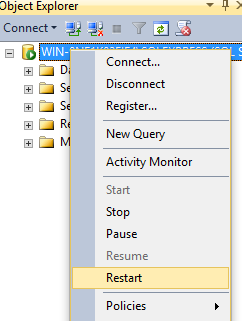
- You will need to restart SQL Server before your changes will take effect. To do this, in Object Explorer, right-click on the server name and select Restart from the contextual menu:
Now that you've created your new login and allowed SQL Server Authentication, you should be able to login to SQL Server using that login and perform tasks against the database.